
Hill Start, Turns And Bends
DOWNHILL START FOR MANUAL VEHICLES
A downhill start involves moving a manual vehicle safely from a stationary position on a downward slope.
The main focus is preventing the vehicle from rolling forward uncontrollably and maintaining smooth control using the brake, clutch, and accelerator.
STEPS FOR A DOWNHILL START
Keep your right foot on the brake pedal to hold the vehicle stationary.
Keep your left foot on the clutch pedal before selecting a gear.
Usually, first gear is used for short downhill slopes, or second gear for steeper descents to avoid excessive engine revs.
If the handbrake is on, release it slowly while keeping the brake pressed with your right foot.
Gently release the brake pedal to allow the vehicle to start moving forward gradually.
Slowly release the clutch until the engine engages, giving you controlled forward movement.
Press the accelerator lightly to maintain a controlled speed without jerking.
Keep a safe distance from vehicles ahead and behind.
Scan mirrors and blind spots constantly.
Always avoid sudden clutch release to prevent the vehicle from lurching forward.
Use engine braking by keeping the vehicle in gear rather than relying only on brakes.
Maintain a low speed on steep slopes to ensure control.
Never start downhill on narrow or busy roads without clear visibility.
THREE POINT TURN (K-TURN)
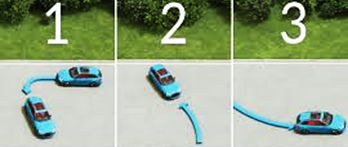
The three-point turn is a driving maneuver used to turn a vehicle around on a narrow road where a U-turn is not possible.
It requires patience, awareness, and careful control of the vehicle.
Move to the outer part of your lane, this creates enough space for the turn.
Check your mirrors and surroundings for approaching traffic from both directions.
Signal your intention to indicate that you are about to turn.
Stop the vehicle when it is safe and ensure there is no oncoming or following traffic.
POINT 1 – MOVE FORWARD (LEFT TURN)
Turn your steering wheel fully to the left.
Release the clutch gently (manual car) and move slowly across the road toward the opposite curb or edge.
Stop just before reaching the edge of the road.
Check both sides for traffic before moving forward.
POINT 2 – REVERSE BACK (RIGHT TURN)
Engage reverse gear.
Turn your steering wheel fully to the right.
Reverse slowly back toward the original side of the road, watching through the rear-view and side mirrors.
Stop when your front wheels are near the center of the road.
Always look behind over your shoulder while reversing.
POINT 3 – MOVE FORWARD AGAIN
Shift back into first gear (or Drive in automatic).
Turn the steering wheel fully to the left once more.
Move forward slowly into the opposite lane to complete the turn.
Straighten your wheels and continue driving forward.
Look both ways again to ensure the road is still clear before proceeding.
Perform a three-point turn only where the road is clear and visibility is good.
Avoid busy roads, bends, or junctions.
Always use your mirrors and signal properly before and after turning.
Move slowly and carefully, control is more important than speed.
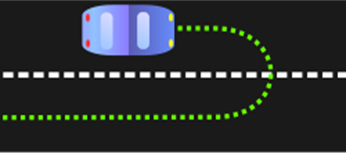
J-TURN (REVERSE TURN MANEUVER)
A J-turn is a driving maneuver used to quickly reverse direction by reversing the vehicle, turning 180° and continues, facing forward, without changing direction of travel.
It is mainly used in emergency or advanced driving situations, not recommended for normal road driving.
The maneuver forms the shape of the letter “J”, hence the name “J-turn.”
It involves reversing in a straight line, then turning sharply to swing the front of the vehicle around 180°, and finally driving forward in the opposite direction.
Ensure the area is clear and open, no pedestrians, obstacles, or vehicles nearby.
Engage reverse gear and begin reversing in a straight line.
At moderate reversing speed, turn the steering wheel sharply in the direction you want to face.
As the vehicle rotates 180°, shift to first gear (or Drive in automatic).
Accelerate smoothly forward to complete the turn.
The J-turn should only be attempted in safe, controlled environments, such as driving courses or training grounds.
Do not perform this maneuver on public road, it is considered unsafe and illegal in normal traffic.
Always wear a seatbelt and ensure good vehicle control before attempting.
This technique requires confidence, experience, and instructor supervision.
The three-point turn is a driving maneuver used to turn a vehicle around on a narrow road where a U-turn is not possible.
It requires patience, awareness, and careful control of the vehicle.
Move to the outer part of your lane, this creates enough space for the turn.
Check your mirrors and surroundings for approaching traffic from both directions.
Signal your intention to indicate that you are about to turn.
Stop the vehicle when it is safe and ensure there is no oncoming or following traffic.
POINT 1 – MOVE FORWARD (LEFT TURN)
Turn your steering wheel fully to the left.
Release the clutch gently (manual car) and move slowly across the road toward the opposite curb or edge.
Stop just before reaching the edge of the road.
Check both sides for traffic before moving forward.
POINT 2 – REVERSE BACK (RIGHT TURN)
Engage reverse gear.
Turn your steering wheel fully to the right.
Reverse slowly back toward the original side of the road, watching through the rear-view and side mirrors.
Stop when your front wheels are near the center of the road.
Always look behind over your shoulder while reversing.
POINT 3 – MOVE FORWARD AGAIN
Shift back into first gear (or Drive in automatic).
Turn the steering wheel fully to the left once more.
Move forward slowly into the opposite lane to complete the turn.
Straighten your wheels and continue driving forward.
Look both ways again to ensure the road is still clear before proceeding.
Perform a three-point turn only where the road is clear and visibility is good.
Avoid busy roads, bends, or junctions.
Always use your mirrors and signal properly before and after turning.
Move slowly and carefully, control is more important than speed.
J-TURN (REVERSE TURN MANEUVER)
A J-turn is a driving maneuver used to quickly reverse direction by reversing the vehicle, turning 180° and continues, facing forward, without changing direction of travel.
It is mainly used in emergency or advanced driving situations, not recommended for normal road driving.
The maneuver forms the shape of the letter “J”, hence the name “J-turn.”
It involves reversing in a straight line, then turning sharply to swing the front of the vehicle around 180°, and finally driving forward in the opposite direction.
Ensure the area is clear and open, no pedestrians, obstacles, or vehicles nearby.
Engage reverse gear and begin reversing in a straight line.
At moderate reversing speed, turn the steering wheel sharply in the direction you want to face.
As the vehicle rotates 180°, shift to first gear (or Drive in automatic).
Accelerate smoothly forward to complete the turn.
The J-turn should only be attempted in safe, controlled environments, such as driving courses or training grounds.
Do not perform this maneuver on public road, it is considered unsafe and illegal in normal traffic.
Always wear a seatbelt and ensure good vehicle control before attempting.
This technique requires confidence, experience, and instructor supervision.
U-TURN (FORWARD TURN MANEUVER)
A U-turn is a driving maneuver in which a driver turns the vehicle 180° while moving forward to travel in the opposite direction.
It is commonly used when you need to change direction on a two-way road or missed a turn and want to go back.
The maneuver forms the shape of the letter “U”, hence the name “U-turn.”
It requires careful observation, control of speed, and ample road space.
U-turns are only allowed where road signs permit and when it is safe to do so.
Ensure there are no “No U-turn” signs or road markings prohibiting the maneuver.
Move close to the center line or right-hand edge (for right-hand drive roads).
Look ahead, behind, and to both sides to confirm the road is clear of approaching vehicles and pedestrians.
Indicate clearly to warn other road users that you intend to turn.
Turn the steering wheel fully in the direction of the U-turn while moving forward slowly.
Accelerate gradually and complete the turn smoothly into the opposite lane.
Adjust the steering wheel to straighten the vehicle and continue driving in the new direction.
Never make a U-turn on sharp bends, hilltops, junctions, or busy roads.
Avoid making a U-turn in narrow streets or where visibility is poor.
Always give right of way to other road users.
Perform the maneuver slowly and with full awareness of your surroundings.
DRIVING THROUGH BENDS AND CORNERS
Driving through bends requires good judgment, proper speed control, and full awareness of road conditions.
Approaching a bend too fast can cause skidding, drifting into another lane, or loss of control.
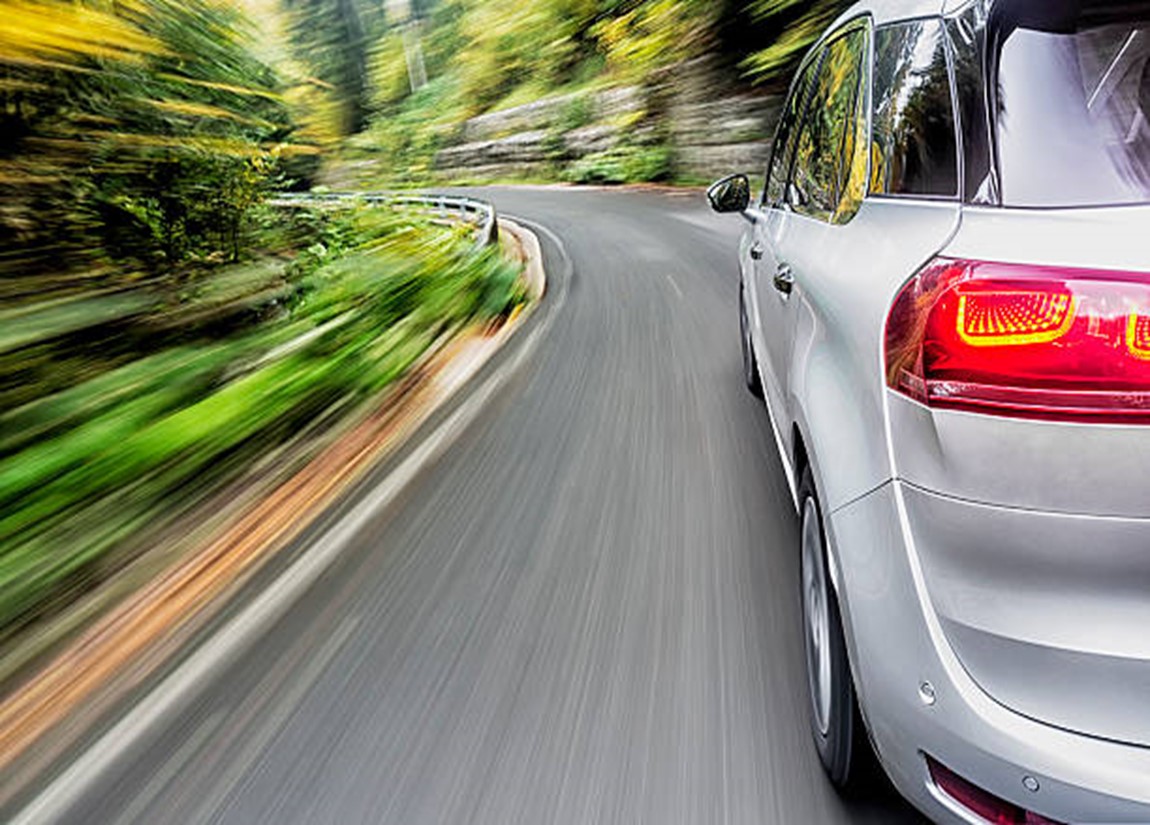
Watch for warning signs, road markings, and surrounding landmarks to judge how sharp the bend is.
Look ahead and plan your steering early, the sharper the bend, the lower the speed should be.
Reduce speed in good time while the vehicle is still straight.
Select an appropriate lower gear before turning.
Avoid harsh braking or acceleration mid-bend as this can cause loss of traction.
Apply the MSM Technique (Mirror, Signal, Manoeuvre)
Mirror – Check your mirrors to assess traffic behind.
Signal – Indicate your intention to other road users if necessary.
Manoeuvre – Slow down, steer smoothly, and maintain a steady path through the bend.
Keep both hands firmly on the steering wheel.
Maintain a steady speed, do not brake while turning.
Look through the bend to where you want the vehicle to go (this helps with natural steering control).
Check your mirrors again.
Gently accelerate as the vehicle straightens to regain normal driving speed.
Never overtake on a bend; visibility is limited.
Avoid cutting across lanes, stay within your side of the road.
Be cautious of oncoming vehicles that may swing wide.
In wet or slippery conditions, take bends even slower than usual.
Maintain a safe distance from vehicles ahead when stopping on roads or at junctions.